Installing and using Nmap [Linux/Windows]
I'm afraid I've been very busy lately with a new job working overnights and figuring out all my college needs for moving in next month, but I've been doing a lot of research and reading on a few interesting topics so hopefully the next few posts will be very interesting.
Installing it with the terminal or command prompt is as easy as running one command: "sudo apt-get install nmap" and remember, the "sudo" super user do command is only necessary if you're not the root or a super user already.
If this doesn't work for you for some reason, you can do the following (exactly like how we've installing SSLStrip and Ettercap)...
Hit the "yes" prompt and continue on. It will ask you to un-install the older version first and you should do so by hitting "uninstall." It will then ask you to install it again (just hit next and install it again).
After it's all done, it will come up with the following window:

I would suggest keeping the "start WinPcap service at startup" checked, but if you like a clean startup when loading your computer, turn it off.
It should be all ready to load, hit the finish key and go to your desktop to open it (double click the file of course to open it), it will be called "Nmap - Zenmap GUI"
Zenmap is the GUI (graphical user interface) version of Nmap. When we're on Linux we will be using both, but I prefer the command prompt (terminal use) version over the GUI.
Scroll down and lets start some basic usage of Zenmap on our Windows system!
Using Nmap on Linux:
First, lets start off with some basic usage in the terminal using nmap to scan some nodes and websites.
Open up a new terminal and issue the command "nmap google.com" and review the results.
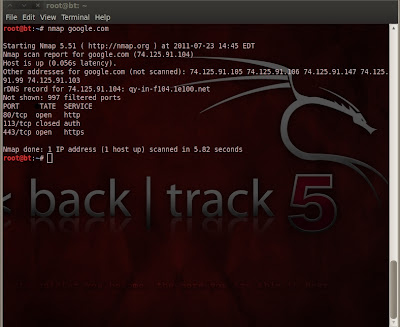
Now, try running that command with the "verbose" option on (verbose means "wordy" or in layman's terms more output).
Run the command "nmap -v google.com" and watch the difference in output.
Using Nmap on Windows:
The "target" is obviously our target for the scan we want, the "profile" is the type of scan which changes the "command" line accordingly. I'll describe what each option does and what the profiles are used for, but if you use the Linux version, the options in the command line are the same.
You can see the "hosts" and "services" tabs which we will be using when scanning multiple targets and when saving and reopening old scans.
Also you can see the "nmap output" which is a nice output view of what nmap is doing/has done, similar to what you would see in the command prompt in Linx.
The ports/hosts tab shows the open/filtered ports after completing a test, and we will be using this tab later.
The "topology" is an interesting tab that shows you traceroute and the location of each nmap scan.
The host details is important since it tells us what the host is running and other useful information we will be using.
The "scans" tab is our scans that we've run this session. It's useful if you want to scan multiple targets every use and want to look back at the results.
After that quick explanation lets run a basic scan and view the results.
Type into the "target" "www.google.com" and leave "intense scan" on then click the "scan" button to start.
When we start, it should start outputting text such as "initiating scan" then "scanning www.google.com" and google's IP address and a bunch more stuff. Here's what mine looks like at the bottom of the page since there's quite a bit of output.
Whoa. That's a lot of gibberish to most of you I assume, so here's the quick rundown.
About 1/5th of the way down, after the "PORT STATE SERVICE VERSION" line, it lists "80/tcp open http Google http 2.0 (GFE)"
Well, what's all that mean? It means that the port 80 on tcp (there are two types of ports, TCP and UDP ports if you didn't know) is open, and that port is running their HTTP server and it is running "Google http 2.0"
Below that it states that 113 is closed, and 443 is open as well.
Well, 80 is the classic HTTP (hypertext transfer protocol) which is how we connect to google.com and all other sites, and 443 is the HTTPS which is the "secure" version of websites (gmail uses HTTPS rather than HTTP as we saw in the Wifi-sniffing tutorial).
Since Google only has two ports open, this doesn't give us much information since we already KNOW those are open by connecting to google.com and gmail.com (a HTTP version and an HTTPS version).
At the bottom is a "traceroute" which counts the "hops" or how many nodes away it took to connect to Google.com. Since I live in Upstate New York, you can see the first hop address is "cable1-0.albynygnv-ar401.nyroc.rr.com (67.252.0.1)" which means my computer sent packets to that IP address first, which then routed them to the second, third, fourth, fifth, sixth and finally the seventh hop which then sent it to Google.com, completing the "route" which we traced (hence "traceroute").
Lets make nmap output a little less output that may confuse you. In the "command" line you may have noticed the "-v" option which stands for the verbose option which means "wordy"
With this option on, nmap gives us more output versus the normal option of having it not on, and many people appreciate this. For now, lets turn it off by selecting the "-v" and deleting it. The "profile" should turn blank but don't worry, it turned blank because we're using a "custom" command. Try rerunning the scan after deleting that section. The output for me is below.
Well that seems a lot easier to digest, right? There's still a lot of information you won't understand but all the basics we went over before are still there, it's just a sweeter and shorter output. Verbose has its time and place and I definitely suggest having it on if you can handle it, but at first try having it off to de-clutter your output.
Lets try scanning a REAL target that isn't as secure as Google. I'll be editing out the website I'm scanning so not to cause any security issues with them, but it will still give a good output for you to review.
Here's my output with verbose off for the website I'm scanning (website name and IPs edited):
Now there's a good scan. We can see that they have their FTP, SSH, SMTP, POP3 and other ports open with running applications!
FTP is a commonly used protocol called File Transport Protocol and can be exploited to gain access to sensitive information stored on the server.
SSH is of course the Secure Shell server and can be used to gain root access to the server and a slew of interesting things.
SMTP is the Simple Mail Transport Protocol and is used for web-mail and can, of course be exploited to gain access to mail and other things.
POP3 is the Post Office Protocol and is a way for clients to retrieve mail from the server. Guess what we can do with it? Exploit it to gain access to their mail servers.
The other ports are interesting, too, and can also be exploited in various ways.
Hopefully I'll be able to show you exploits pertaining to these types of services in the near future, but they will probably be on insecure boxes I've loaded myself and not REAL targets, since I'm not experienced enough to gain access to updated and regularly scanned targets... yet.
Now, I would show you a localhost (your computer) ping, but unfortunately the Windows version of Nmap has issues with this, so if you want to scan your own computer and see what ports are open and how to secure them, check out the Linux version of Nmap and my tutorial above for this information.
I was also trying to set up my vulnerable VMWare to ping from my machine but apparently I can't since it's still considered the "localhost" (which is my machine), to any of my more advanced readers, is there anyway around this so I can Nmap my VMWare from my XP? I'll be doing this from my Linxtop in the above tutorial in Linux, so you can view it there, but for now I can't show a more interesting Nmap scan, sorry!I figured out my problem... and it was stupidly simple, but I've been working and tired a lot so it must have slipped through my mind. I'll hopefully have a more in depth tutorial up soon =D
I've also updated a few of my posts including my wifi sniffing and securing your home network posts, so check those out!
Today's post is about one of the most important netsec tools you will have in your arsenal. This program is called Nmap and is a free, open-source network auditing and security tool that we will use quite often while looking for vulnerabilities on networks.
I will be explaining how to install and do some basic usage on Linux AND Windows (yay Windows!). I will be using my Backtrack 5 for Linux and Windows XP and hopefully get a Vista/Win7 part up as well.
Installing Nmap on Linux:
Installing Nmap on Linux:
If you're using Backtrack 5, it should be automatically installed and updated, but if for some reason it's not you can follow this walk-through for non-BT users.
Installing it with the terminal or command prompt is as easy as running one command: "sudo apt-get install nmap" and remember, the "sudo" super user do command is only necessary if you're not the root or a super user already.
If this doesn't work for you for some reason, you can do the following (exactly like how we've installing SSLStrip and Ettercap)...
- Download this file to your Linux desktop or home.
- Navigate to that location in your terminal using the "cd" command.
- Issue the command "tar xvf [file name]" where the file name in this case is "nmap-5.51.tar.bz2"
- Then type the command "cd nmap-5.51"
- Next, type "./configure"
- Then "make"
- Then finally "make install"
- If this command doesn't work, make sure you're the super user (you can type su [username] to do this or type "sudo" before the command).
This should correctly install version 5.51 of nmap. You can now use this amazing tool. Scroll down to view a basic tutorial and overview on some of its usages.
Installing Nmap on Windows XP, Vista, 7, NT, and 2k:
Every Windows should have the same installation, but mine will be done on XP since I don't have Vista or 7 available at the moment, so if there's any complications with Vista, 7, or another version tell me and I'll try to help you with it.
Lets start, first, download this file and save it to your computer, it should only take a few seconds to complete.
Next, double click the file so it opens (as an exe does) and click through the first page by hitting "I agree."
The next window should have all the options selected but if they aren't, select them all and hit next.
After you hit next, it should prompt where to install. The default location is C:\Program Files\Nmap\ which is fine. Hit the install key and let it do its thing.
If you have a different version already installed, it will prompt you with the following message:

Installing Nmap on Windows XP, Vista, 7, NT, and 2k:
Every Windows should have the same installation, but mine will be done on XP since I don't have Vista or 7 available at the moment, so if there's any complications with Vista, 7, or another version tell me and I'll try to help you with it.
Lets start, first, download this file and save it to your computer, it should only take a few seconds to complete.
Next, double click the file so it opens (as an exe does) and click through the first page by hitting "I agree."
The next window should have all the options selected but if they aren't, select them all and hit next.
 |
| Make sure all of them are selected. |
After you hit next, it should prompt where to install. The default location is C:\Program Files\Nmap\ which is fine. Hit the install key and let it do its thing.
If you have a different version already installed, it will prompt you with the following message:

Hit the "yes" prompt and continue on. It will ask you to un-install the older version first and you should do so by hitting "uninstall." It will then ask you to install it again (just hit next and install it again).
After it's all done, it will come up with the following window:

I would suggest keeping the "start WinPcap service at startup" checked, but if you like a clean startup when loading your computer, turn it off.
It should be all ready to load, hit the finish key and go to your desktop to open it (double click the file of course to open it), it will be called "Nmap - Zenmap GUI"
Zenmap is the GUI (graphical user interface) version of Nmap. When we're on Linux we will be using both, but I prefer the command prompt (terminal use) version over the GUI.
 |
| A screenshot of the shortcut on my desktop - Windows XP SP3 |
First, lets start off with some basic usage in the terminal using nmap to scan some nodes and websites.
Open up a new terminal and issue the command "nmap google.com" and review the results.

Run the command "nmap -v google.com" and watch the difference in output.
Using Nmap on Windows:
Now it's time to open up Nmap and start some basic scanning.Double click on your icon to open up the program and it will look like this on Windows XP:
 |
| Nmap opening screen. |
You can see the "hosts" and "services" tabs which we will be using when scanning multiple targets and when saving and reopening old scans.
Also you can see the "nmap output" which is a nice output view of what nmap is doing/has done, similar to what you would see in the command prompt in Linx.
The ports/hosts tab shows the open/filtered ports after completing a test, and we will be using this tab later.
The "topology" is an interesting tab that shows you traceroute and the location of each nmap scan.
The host details is important since it tells us what the host is running and other useful information we will be using.
The "scans" tab is our scans that we've run this session. It's useful if you want to scan multiple targets every use and want to look back at the results.
After that quick explanation lets run a basic scan and view the results.
Type into the "target" "www.google.com" and leave "intense scan" on then click the "scan" button to start.
When we start, it should start outputting text such as "initiating scan" then "scanning www.google.com" and google's IP address and a bunch more stuff. Here's what mine looks like at the bottom of the page since there's quite a bit of output.
 |
| Verbose Google.com Nmap scan |
About 1/5th of the way down, after the "PORT STATE SERVICE VERSION" line, it lists "80/tcp open http Google http 2.0 (GFE)"
Well, what's all that mean? It means that the port 80 on tcp (there are two types of ports, TCP and UDP ports if you didn't know) is open, and that port is running their HTTP server and it is running "Google http 2.0"
Below that it states that 113 is closed, and 443 is open as well.
Well, 80 is the classic HTTP (hypertext transfer protocol) which is how we connect to google.com and all other sites, and 443 is the HTTPS which is the "secure" version of websites (gmail uses HTTPS rather than HTTP as we saw in the Wifi-sniffing tutorial).
Since Google only has two ports open, this doesn't give us much information since we already KNOW those are open by connecting to google.com and gmail.com (a HTTP version and an HTTPS version).
At the bottom is a "traceroute" which counts the "hops" or how many nodes away it took to connect to Google.com. Since I live in Upstate New York, you can see the first hop address is "cable1-0.albynygnv-ar401.nyroc.rr.com (67.252.0.1)" which means my computer sent packets to that IP address first, which then routed them to the second, third, fourth, fifth, sixth and finally the seventh hop which then sent it to Google.com, completing the "route" which we traced (hence "traceroute").
Lets make nmap output a little less output that may confuse you. In the "command" line you may have noticed the "-v" option which stands for the verbose option which means "wordy"
With this option on, nmap gives us more output versus the normal option of having it not on, and many people appreciate this. For now, lets turn it off by selecting the "-v" and deleting it. The "profile" should turn blank but don't worry, it turned blank because we're using a "custom" command. Try rerunning the scan after deleting that section. The output for me is below.
 |
| Non-verbose Google.com Nmap scan |
Lets try scanning a REAL target that isn't as secure as Google. I'll be editing out the website I'm scanning so not to cause any security issues with them, but it will still give a good output for you to review.
Here's my output with verbose off for the website I'm scanning (website name and IPs edited):
 |
| Non-verbose website Nmap scan |
FTP is a commonly used protocol called File Transport Protocol and can be exploited to gain access to sensitive information stored on the server.
SSH is of course the Secure Shell server and can be used to gain root access to the server and a slew of interesting things.
SMTP is the Simple Mail Transport Protocol and is used for web-mail and can, of course be exploited to gain access to mail and other things.
POP3 is the Post Office Protocol and is a way for clients to retrieve mail from the server. Guess what we can do with it? Exploit it to gain access to their mail servers.
The other ports are interesting, too, and can also be exploited in various ways.
Hopefully I'll be able to show you exploits pertaining to these types of services in the near future, but they will probably be on insecure boxes I've loaded myself and not REAL targets, since I'm not experienced enough to gain access to updated and regularly scanned targets... yet.
Now, I would show you a localhost (your computer) ping, but unfortunately the Windows version of Nmap has issues with this, so if you want to scan your own computer and see what ports are open and how to secure them, check out the Linux version of Nmap and my tutorial above for this information.