[2013 Version] Starting a Pentesting Lab [How-To/Linux/Windows]
Recently I bought a gaming computer with some of the best specs out there (i7, gtx670, 16gig ram, ssd, etc) and decided to finally set up my own Pentesting lab so I can practice breaking and securing "real" boxes of my own.
My current setup consists of my router connected to my apartment's WAN using DHCP, which issues private DHCP leases to the connected boxes on my network. I have a Windows 7 laptop of my own, a Windows 7 desktop host machine running VMs, and a Ubuntu 12.10 server for all my main Linux needs (I have SSH set up so I can access this box from work and other places).
My friends also connect to this network via Wifi, so there are random Win7 and OSx computers connected to it.
As for my virtualized boxes, I have Windows XP (different SPs), Windows Server 2003, 2008, and 2012, Metasploitable 2, DVL (Damn Vulnerable Linux), BackTrack5R3 (I hack from this box), and a few other exploitable machines. I will be setting up a Windows Vista and a couple other *nix distros to exploit, as well.
I am using VMWare Workstation, which is provided to me for free through my University and our MSDNAA agreement. For those who do not have access to such great tools, you can use the free version VMWare Player, but be forewarned that certain options may be different. I apologize if there are any problems when following my guides using Player instead of Workstation, but I will do my best to remedy these.
Getting Started
If you already have a VM loader or specifically a VMWare application installed, ignore the following instruction as they are for people who do not have a VM loader.
From the links below, download your flavor of VMWare you can use (if you are a student who has MSDNAA access, I highly suggest getting Workstation). If you do not like VMWare, there are also alternatives, but I suggest using VMWare as all my instructions will be using that.
VM Applications:
- VMWare Workstation - Requires Activation Key after 30 days
- VMWare Player - Free
- VirtualBox - Free (Download links for Windows, OSx, and Linux)
- Parallels - Costs Money; For OSx
- QEMU - Free; For Linux
- Virtual PC - Free; For running XP (honestly just use one of the above, but to each their own)
Once you have installed the VM application, we can start by collecting vulnerable VMs and the sort.
Collecting Vulnerable VMs
This may require a decent amount of hard disk space, so I would suggest making sure you have enough to download and keep the drives on your disk. I have a few separate, cheap 7200rpm WD's from 250-500gigs specifically for downloading and running VMs off of.
Below is a list of exploitable and vulnerable VMs/ISOs(updated 10/29/12):
Metasploitable 2 - Probably the best VM to use. Complete vulnerable VM with services set up for everything. Most of my tutorials will start with exploiting this.
Damn Vulnerable Linux 1.5 - Discontinued, but I have the ISO. I will upload it *somewhere* when I'm home. Either directly through this site or on a sharing site (you could torrent, but I want all the download to be able to be directly downloaded).
LAMP Security Training - LAMP stands for Linux Apache MySQL PHP, and this version is for the security testing of those.
Open Web Application Security Project (OWASP) Broken Web Applications Project - Self Explanatory; OWASP's Broken Web App Project!
Below is a list of VMs and ISOs that you can configure yourself:
UltimateLAMP - Scroll down for the download link; a complete LAMP (Linux, Apache, MySQL, PHP) distro.
Below is a list of VMs and ISOs to hack from:
BackTrack5R3 - I use the Gnome 32bit VM one and just load it into my VMWare; all of my tutorials will be from Ubuntu 12.04 LTS, or BT5R3 (which is Ubuntu, as well). BackTrack has been replaced by the following: Kali Linux
BackBox - Another Ubuntu based Pentesting distro
BlackBuntu - Yet another Ubuntu based Pentesting distro
Metasploitable 2 - Probably the best VM to use. Complete vulnerable VM with services set up for everything. Most of my tutorials will start with exploiting this.
Damn Vulnerable Linux 1.5 - Discontinued, but I have the ISO. I will upload it *somewhere* when I'm home. Either directly through this site or on a sharing site (you could torrent, but I want all the download to be able to be directly downloaded).
LAMP Security Training - LAMP stands for Linux Apache MySQL PHP, and this version is for the security testing of those.
Open Web Application Security Project (OWASP) Broken Web Applications Project - Self Explanatory; OWASP's Broken Web App Project!
Below is a list of VMs and ISOs that you can configure yourself:
UltimateLAMP - Scroll down for the download link; a complete LAMP (Linux, Apache, MySQL, PHP) distro.
Below is a list of VMs and ISOs to hack from:
BackBox - Another Ubuntu based Pentesting distro
BlackBuntu - Yet another Ubuntu based Pentesting distro
Creating Your Pentesting Network
Now that we have a host machine with a virtual machine application (I suggest VMWare), it's time to set up your network so you can see all your exploitable (and maybe non exploitable) VMs!
For the machines that are already built for VM usage (aka they're VMDK and not ISO), just double click the .VMX file which is the configuration file for the virtual machine, and it will automatically open with the configured VM software.
For the machines that you downloaded in ISO format, we have to add them into our VM software. Below I will show you how to do so in VMWare Workstation (though I believe the free version of VMWare is the same).
Creating a Virtual Machine from an ISO
Now we'll be loading Ubuntu Server 12.04.1 LTS (Long Time Support) since it is a good operating system to mess around with and learn Linux on. Most if not all other ISO installations will be just as easy as this one.
To start, open VMware Workstation. Mine looks like the following, but yours will have no VMs added/opened.
To add a new virtual machine, from the upper left "File" drop down, select "New Virtual Machine".

We are going to select "Typical" which is the recommended setting. For most if not all VMs you will be using in your lab you can just select the typical settings. Hit next to continue to the next part which we will be...
Selecting the installer disk image, or the ISO file that you have previously downloaded at the above or an alternative link.

Click on browse and locate the ISO you wish to install. We are using our Ubuntu 12.04.1, but we have many others to choose from as you can see.

Once you select the correct ISO and hit next, it will prompt for some "Easy Install Information" since it recognizes that we are installing Ubuntu 64-bit.
For these settings, just enter what you want, but keep in mind the username cannot have capitals, and a password is required (I usually just do my first name with "test" or something lame).

After you have done this, hit next as normal.
This part is where you will be selecting what you wish to name your VM, and where you want to store your disk files.
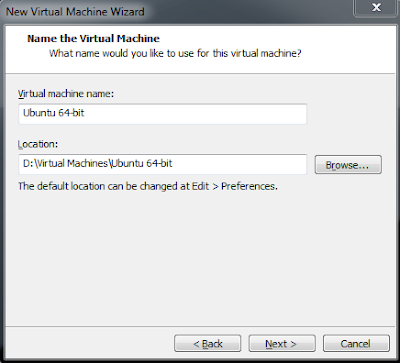
This part is important because you cannot have two of the same name (duh), and because if you store all your VMs together, as they become larger there needs to be sufficient disk space on the drive you are saving them to.
Name each of your Virtual Machines so you can tell them apart. Some of mine have specific names (like Metasploitable2) and some have just the distro name if its generic (like Ubuntu 12.04 LTS).
The next step is the size of the virtual disk you will be creating for this VM. It is very important to make it large enough so that if you use it often (installing applications/writing programs/etc) it will not fill up, but not too large that you're wasting space. Note that the files become larger as you use the space, so you can overshoot a bit for this.
For our Ubuntu I'm just going to put it to 8gigs since I'll probably be deleting it (I already have a few Ubuntus spun up).

After clicking next, this screen shows the brief overview of what we have selected. There is also a "customize hardware" button which we will be utilizing so we do not have to change it after the creation.
Note: We will be changing the virtual adapter (NIC - Network Interface Card) from NAT to Bridged, so if you want NAT, ignore this section.
A bridged connection means that the VM will connect directly to your network like another computer through your NIC (aka it will have its own IP through DHCP/etc).
The default is NAT which means that the computer is essentially the router to your VM.
It all depends on what you want, but I like bridged.

Go ahead and click the Customize Hardware... button so we can change a few options.
You will be presented with the following screen:

The memory is of course the RAM for our virtual machine. I will be leaving this at 1gig, but you can jack it up depending on what you want.
Note that for VMs, it is up to you to choose how much RAM to give it. Certain pre-built VMs like Metasploitable only require a small amount, but others like Windows require more.
Like I said before, we are only changing the Network Adapter settings from NAT to bridged. Click on the "Network Adapter" selection under the Devices or click "Add..." if one is not there.

After this is finished, just click "Close" and "Finished" on the following screen, and your VM should start to boot.
Ubuntu will go through some checks, copy some files, and install on the virtual disk.
Finally it will present you with the login screen (I hope you remembered your credentials).
This method can be used on almost any .iso to install it (any that I've seen); however like I said before, some hacking/vulnerable distros come in a pre-packaged VM like Kali or previously BackTrack.
To start, open VMware Workstation. Mine looks like the following, but yours will have no VMs added/opened.
 |
| When I load up my VMware Workstation; basic view |

Selecting the installer disk image, or the ISO file that you have previously downloaded at the above or an alternative link.

Click on browse and locate the ISO you wish to install. We are using our Ubuntu 12.04.1, but we have many others to choose from as you can see.

For these settings, just enter what you want, but keep in mind the username cannot have capitals, and a password is required (I usually just do my first name with "test" or something lame).

After you have done this, hit next as normal.
This part is where you will be selecting what you wish to name your VM, and where you want to store your disk files.

This part is important because you cannot have two of the same name (duh), and because if you store all your VMs together, as they become larger there needs to be sufficient disk space on the drive you are saving them to.
Name each of your Virtual Machines so you can tell them apart. Some of mine have specific names (like Metasploitable2) and some have just the distro name if its generic (like Ubuntu 12.04 LTS).
The next step is the size of the virtual disk you will be creating for this VM. It is very important to make it large enough so that if you use it often (installing applications/writing programs/etc) it will not fill up, but not too large that you're wasting space. Note that the files become larger as you use the space, so you can overshoot a bit for this.
For our Ubuntu I'm just going to put it to 8gigs since I'll probably be deleting it (I already have a few Ubuntus spun up).

After clicking next, this screen shows the brief overview of what we have selected. There is also a "customize hardware" button which we will be utilizing so we do not have to change it after the creation.
Note: We will be changing the virtual adapter (NIC - Network Interface Card) from NAT to Bridged, so if you want NAT, ignore this section.
A bridged connection means that the VM will connect directly to your network like another computer through your NIC (aka it will have its own IP through DHCP/etc).
The default is NAT which means that the computer is essentially the router to your VM.
It all depends on what you want, but I like bridged.

Go ahead and click the Customize Hardware... button so we can change a few options.
You will be presented with the following screen:

The memory is of course the RAM for our virtual machine. I will be leaving this at 1gig, but you can jack it up depending on what you want.
Note that for VMs, it is up to you to choose how much RAM to give it. Certain pre-built VMs like Metasploitable only require a small amount, but others like Windows require more.
Like I said before, we are only changing the Network Adapter settings from NAT to bridged. Click on the "Network Adapter" selection under the Devices or click "Add..." if one is not there.

After this is finished, just click "Close" and "Finished" on the following screen, and your VM should start to boot.
Ubuntu will go through some checks, copy some files, and install on the virtual disk.
Finally it will present you with the login screen (I hope you remembered your credentials).
This method can be used on almost any .iso to install it (any that I've seen); however like I said before, some hacking/vulnerable distros come in a pre-packaged VM like Kali or previously BackTrack.